Easy Desktop Wallpaper Organizer Ideas
Desktop wallpaper organizers are a game-changer for taming digital clutter! Does your computer desktop resemble a chaotic to-do list, a forgotten graveyard of downloads, or a frantic scavenger hunt every time you need a file? If so, you’re not alone. Many of us struggle with keeping our digital workspace tidy, leading to wasted time and unnecessary stress. Imagine instead a visually appealing desktop that not only looks beautiful but also instantly guides you to exactly what you need. Think clear categories, intuitive placement, and a sense of calm productivity. The best part? This transformation is surprisingly affordable, often costing nothing but a little time, and you can set up a functional system in under an hour. In this article, I’ll show you how to find or create the perfect wallpaper organizer, explore the simple setup process, and share tips to maintain your newfound digital serenity.
Transform Your Digital Chaos: Desktop Wallpaper Organizers for a Serene Workspace
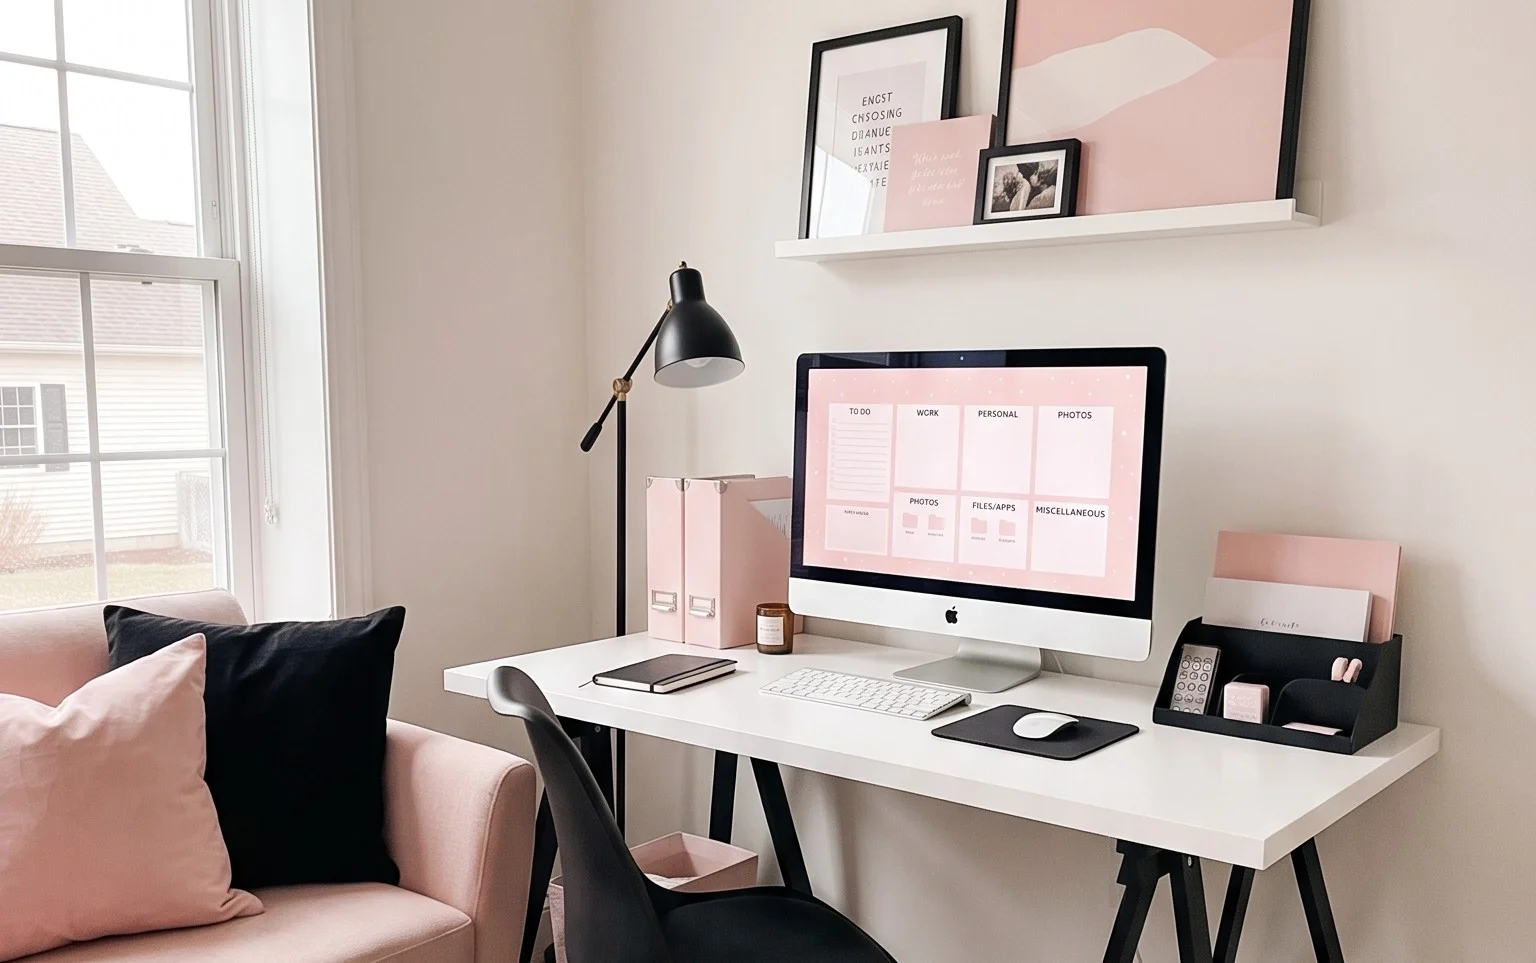
Ever find yourself staring at your computer screen, a jumbled mess of icons and forgotten downloads blurring into an overwhelming digital landscape? I certainly have! For years, my desktop was a graveyard of unfinished projects, random screenshots, and files I’d sworn I’d get to “later.” It was stressful, unproductive, and frankly, an eyesore. Then, I discovered the magic of desktop wallpaper organizers. It sounds a bit abstract at first, doesn’t it? How can a static image organize anything? But trust me, when you find the right design and implement it properly, it becomes a powerful tool for digital tidiness and a surprisingly stylish addition to your workspace.
This isn’t about just slapping a pretty picture onto your background. This is about creating intentional zones on your screen, assigning specific purposes to different areas, and making it intuitive to file away your digital life. Think of it as a visual filing cabinet, but one that lives right where you spend your work or creative time.
What You Need and Roughly What It Costs
The beauty of this organizational system is its affordability and accessibility. You likely already have most of what you need.
* **A Computer with a Display:** This is the obvious one!
* **A Desktop Wallpaper Organizer Template:** This is your core tool. You can find free, high-quality templates online. Search for terms like “desktop organizer wallpaper,” “digital planner wallpaper,” or “mac desktop organizer.” Many talented designers offer these for free, often with a suggestion to buy them a coffee if you find it useful. If you want something more bespoke or with specific features, you might find paid options on platforms like Etsy, typically ranging from $2 to $10.
* **Optional: Basic Photo Editing Software:** While not strictly necessary for free templates, if you find a template you love but want to tweak the colours or add your own branding, you might need something like Canva (free tier is excellent), GIMP (free and open-source), or even built-in tools like Photos on macOS or Paint on Windows.
* **Your Digital Files!** This is the real “material” you’ll be organizing.
So, for the core setup, your cost can be as low as $0! If you opt for a paid template and some advanced customization, you’re looking at a maximum of around $10.
Measuring and Planning Before You Start
Before you download a single wallpaper and start dragging icons around, a little planning goes a long way. This step is crucial to ensure your organizer actually fits your workflow and your screen.
* **Know Your Screen Resolution:** This is paramount. Your wallpaper needs to match your screen resolution to avoid looking stretched or pixelated.
* To find this: On Windows, right-click on your desktop and select “Display settings.” Look for “Display resolution.” Common resolutions include 1920×1080 (Full HD) and 2560×1440 (QHD).
* On macOS, go to “System Preferences” > “Displays.” Your resolution will be listed there.
* **Assess Your Digital Habits:** How do you typically use your computer?
* What types of files do you work with most often? (e.g., documents, images, projects, research, personal files, downloads)
* How many categories do you realistically need? Over-categorizing can be as confusing as no categorization at all. Aim for 4-6 main zones.
* Where do you naturally tend to place things now? Sometimes, understanding your existing (even if messy) habits can inform where you’ll be most comfortable placing new organized folders.
* **Consider Your Workflow:**
* Do you have specific projects that require dedicated space?
* Do you have a lot of temporary files that need a clear “incoming” or “to process” zone?
* Do you use specific applications heavily?
Take a moment to jot down these observations. This planning phase will save you a lot of frustration down the line.
Your Step-by-Step Guide to a Tidy Desktop
Ready to dive in? Here’s how I implemented my desktop wallpaper organizer and how you can too.
1. **Find Your Perfect Template:** Browse online for free or paid desktop wallpaper organizers. Look for designs that have clear sections or “zones” marked out. Consider the aesthetic – do you prefer something minimalist, illustrative, or photographic? Ensure it’s designed for your screen resolution.
2. **Download and Set as Wallpaper:** Once you’ve found a template you love, download the image file. Then, right-click on your desktop, select “Personalize” (Windows) or “Desktop & Screen Saver” (macOS) and choose your downloaded image as your wallpaper. Make sure it’s set to “Fill” or “Fit” to cover your entire screen without distortion.
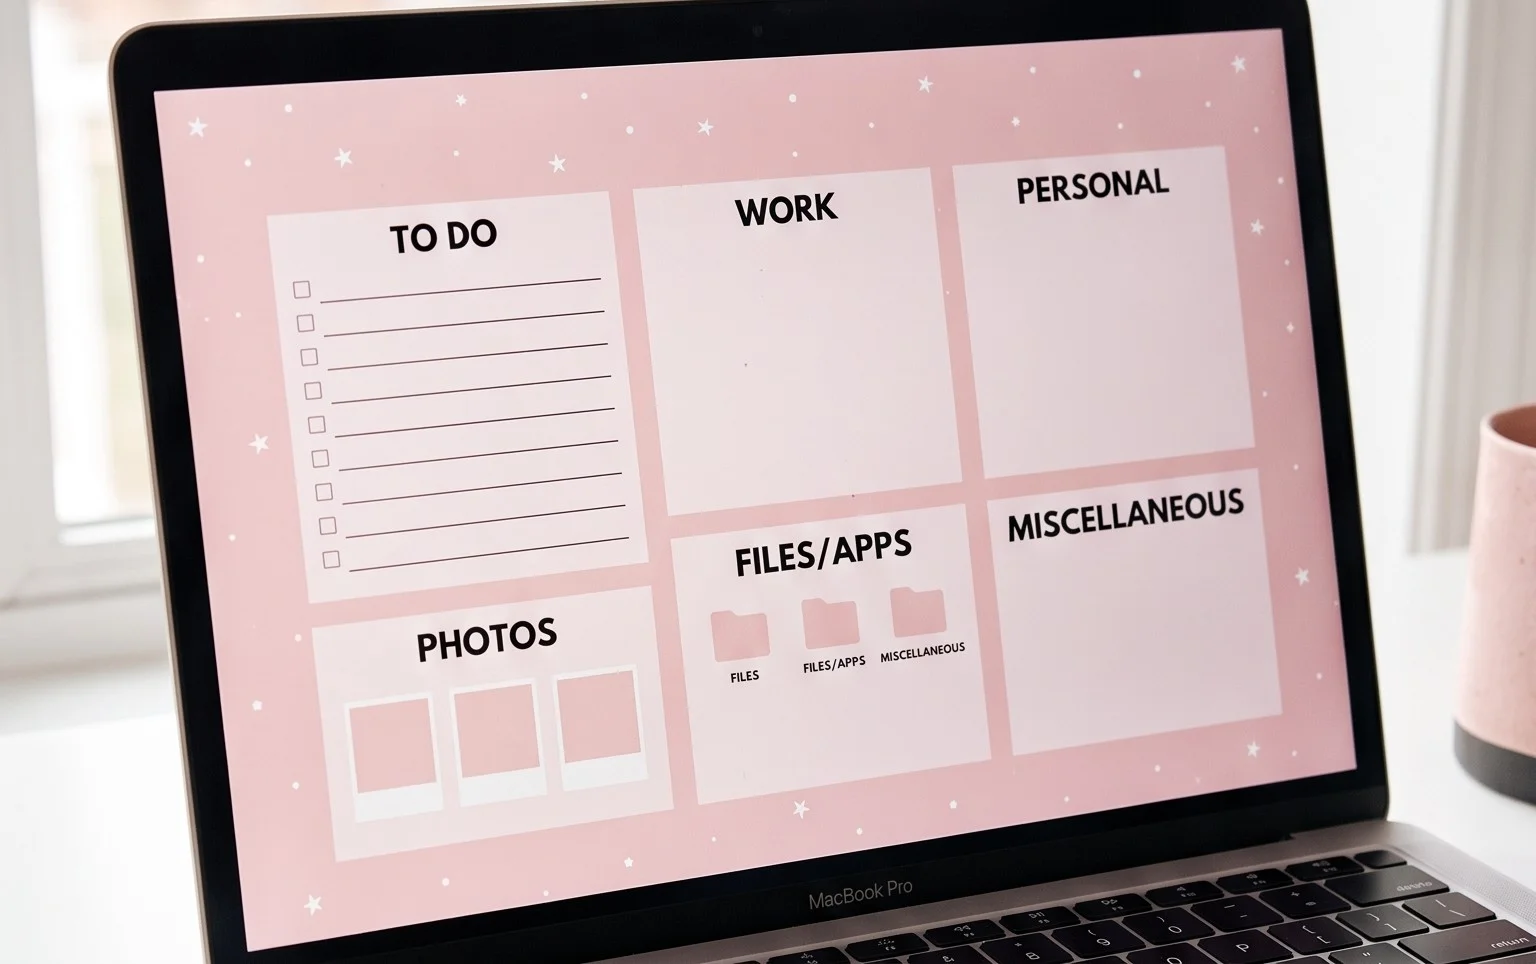
3. **Identify Your Zones:** Look at the downloaded wallpaper. Most templates will have clearly demarcated areas, often with labels. These are your designated filing spots. Common zones include:
* **Today/Urgent:** For immediate tasks and files you’re actively working on.
* **To Do/Process:** For items that need attention but aren’t urgent.
* **Projects/Clients:** Dedicated folders for specific ongoing work.
* **Reference/Resources:** For files you need to access but don’t actively work on.
* **Downloads:** A clear place for all your downloaded files.
* **Completed/Archive:** For finished projects or files you want to keep but don’t need regular access to.
4. **Create Your Folder Structure:** Now, it’s time to create actual folders on your computer that correspond to these zones.
* Open your file explorer (Windows) or Finder (macOS).
* Navigate to your Desktop.
* Create new folders by right-clicking and selecting “New Folder” or using keyboard shortcuts (Ctrl+Shift+N on Windows, Cmd+Shift+N on macOS).
* Name these folders clearly, mirroring the intended purpose of your wallpaper zones. For example, “1. Today,” “2. To Process,” “3. Project X,” “4. Resources.” Adding numbers can help maintain a consistent order.
5. **Assign Folders to Zones:** Drag and drop your newly created folders onto your desktop. Position them within the corresponding zones on your wallpaper organizer. Aim for neat alignment.
6. **Begin Filing!** This is the most important step. As you save new files, download items, or create documents, immediately drag them into the correct folder. If you’re unsure where something belongs, create a temporary “Inbox” folder and process it regularly.
Adapting for Small Spaces and Rentals (No Drilling!)
The beauty of a digital desktop organizer is that it requires absolutely no physical drilling or modification to your space. It’s entirely contained within your computer.
However, if you’re thinking about *physical* organization that complements your digital setup, or if you want to create a more aesthetically pleasing workspace, here are some ideas for small spaces or rentals:
* **Pegboards:** These are a fantastic rental-friendly option. You can mount a pegboard on the wall using command strips or freestanding supports. Use hooks, shelves, and small containers to store stationery, notebooks, cables, and even small plants. This creates visual interest and keeps your desk surface clear.
* **Floating Shelves (Command Strip Friendly):** Many brands offer heavy-duty adhesive strips that can hold small floating shelves. These are perfect for displaying a few decorative items, a small monitor stand, or a place to put your phone.
* **Desk Organizers and Trays:** Invest in stylish desk organizers, magazine holders, and pen cups. These can house your physical files, notebooks, and supplies, keeping them contained and off your main workspace. Look for materials like wood, metal, or acrylic that align with your desired aesthetic.
* **Cable Management Solutions:** Tidy cables make a huge difference. Use cable clips, sleeves, or a cable management box to keep your power cords and USB cables from becoming a tangled mess.
The key is to use non-permanent solutions that allow you to easily remove them when you move out.
Styling Notes: Keeping it Visually Appealing
A well-organized desktop isn’t just functional; it should also be a pleasure to look at.
* **Colour Palette:** Choose a wallpaper organizer whose colour palette complements your overall room decor or your personal preferences. If your room is calm and neutral, opt for a wallpaper with muted tones. If you want a pop of energy, choose something with brighter accents.
* **Texture:** While the wallpaper itself is flat, the icons and folders create texture. Try to maintain a consistent aesthetic for your icons. Many operating systems allow you to customize icons. There are also websites where you can download custom icon packs that match a certain style (e.g., minimalist, hand-drawn, watercolour).
* **What to Put Where:**
* **Top Left:** Often the first place your eyes go. This is a good spot for less frequently accessed but important items, or perhaps a calendar widget if your OS supports it.
* **Central/Lower Areas:** These are prime real estate. Use these for your most frequently accessed project folders or your “To Do” and “Today” zones.
* **Right Side:** Can be good for less visually dominant folders or your “Downloads” or “Archive” zones.
* **Visual Clutter:** Resist the urge to fill every single zone with dozens of subfolders or individual files. The goal is to have a few key folders that act as gateways to your deeper digital organization. If a zone starts to look overwhelming, it’s time to declutter or refine your categories.
Keeping it Tidy After Week One
The initial setup is exciting, but the real magic happens when you maintain the system.
* **The Daily Sweep:** At the end of each workday, take 5 minutes to review your desktop. Drag any stray icons into their correct folders. Empty your “Downloads” folder if it’s getting full. Process any items in your “Today” or “To Do” zones.
* **Weekly Review:** Once a week, perhaps on a Friday afternoon, do a more thorough clean-up.
* Go through your “To Process” folder and file items appropriately.
* Review your “Projects” folders. Are there any completed sub-projects that can be moved to an “Archive” folder?
* Check for duplicate files or unnecessary downloads.
* **Be Ruthless (But Reasonable):** If you haven’t touched a file or folder in months, ask yourself if you really need it easily accessible on your desktop. Consider moving it to a more permanent archive location or even deleting it if it’s no longer relevant.
* **Resist the “Temporary” Folder Abuse:** It’s tempting to dump everything into a temporary folder because it’s quick. However, if this temporary folder becomes a dumping ground, you’ve defeated the purpose. Make it a habit to process it regularly.
Mistakes That Make This Fail
Even with the best intentions, a few common pitfalls can derail your desktop organization efforts.
* **Over-Categorization:** Creating too many small, specific folders on your desktop can be just as overwhelming as having no organization at all. Stick to broad categories that make sense for your workflow.
* **Not Matching Resolution:** This is a purely aesthetic and functional error. If your wallpaper looks weird, you’re less likely to want to use the organizational system it represents.
* **Ignoring the System:** The wallpaper is a visual guide, but it’s useless if you don’t actually file your items into the corresponding folders. The habit of immediately putting things where they belong is key.
* **Letting the Desktop Become a “Junk Drawer”:** This is the most common failure. The desktop should be a curated space, not a free-for-all. If you find yourself constantly dumping things there because it’s the easiest option, your system will crumble.
* **Choosing a Wallpaper You Don’t Like:** If you find the visual of your organizer unpleasant, you’ll unconsciously avoid looking at it and thus, avoid organizing. Pick a design that you genuinely enjoy.
Implementing a desktop wallpaper organizer is a simple yet incredibly effective way to bring order to your digital life. It’s a visual reminder, a guide, and a catalyst for better habits. Give it a try, and you might just find that a tidier desktop leads to a tidier mind and a more productive you!
Conclusion
Implementing a desktop wallpaper organizer is more than just a visual upgrade; it’s a powerful tool for enhancing your daily productivity. Imagine reclaiming those lost minutes spent searching for files, replaced by a clear and intuitive system that greets you every time you power on. The difference it makes to your workflow, reducing stress and increasing efficiency, is truly remarkable.
Ready to experience this change? Your smallest possible first step is to simply choose one category and create a designated folder for it on your desktop. You’ve got this!
For a different atmosphere, consider a kitchen cabinet organization chart or a budget-friendly closet makeover plan.
We hope this has sparked inspiration. Continue exploring our site for even more innovative home decor and organization ideas to transform your living spaces!